
Nginx1.18.+ Reverse-Proxy to Apache2.4+ Configuration For PHP7+ Web Applications (Including WordPress & WPMU) with Cloudflare SSL, DNS, Caching & More
I wanted to do find an optimal and “universal” Nginx Reverse-Proxy to Apache web server configuration For PHP7 web applications for a while. This configuration idea was inspired by a few posts I read about comparisons and contrasts between the two web server. The idea for combining the benefits of nginx caching abilities for smaller files and Apache for faster processing of larger workloads was on my mind. I wanted to explore the benefits by benchmarking improvements to WordPress & WPMU performance by reducing the Network, CPU and RAM costs. In combination with Cloudflare (SSL, DNS, Caching & more), I wasn’t sure if there would be a noticeable improvement to the end user, but perhaps the overall resource load may be reduced under the same average count of operations. I’ve been dabbling with a variety of ways to implement a template for using the Amazing Speed & Caching mechanisms of nginx for serving up static files & content that combines the superior Event MPM & PHP-FPM capabilities that Apache v2.4+ offers for crunching server-side processes (or something like FastCGI for Perl or FastCGI WSGI for Python).
There are a lot of different low-cost cloud infrastructure options that are becoming more appealing. If you prefer to play the “free trial for a year” games with the more complicated AWS & Azure service & stacks, you can also get some pretty cheap Cloud VMs that way, too (just brace yourself for the bill that’s coming next year when the trial is over & you’re married to the chosen platform).
When you combine the low-cost infrastructure options with services like Cloudflare DNS, & ZOHO suite, or some low-cost shared hosting solution combo product for managing data & email resources, you can really do a lot for very low cost.
A properly configured VPS using nginx for serving (& caching) HTML, CSS, JavaScript, images, videos, etc. with a load-balanced & reverse-proxy configuration to an Apache upstream to handle the PHP, Perl and/or Python combined with the power of Cloudflare DNS & its feature rich optimizations & caching… it’s not 2004 anymore! You can really serve up a TON of web requests with minimal resources & next to no cost at all for the static content itself. Prices start climbing higher when you get into things like network-intensive operations (eg: hosting or consuming huge amounts of API calls or maintaining a rapidly growing datastore of some kind) audio or video transcoding, sending or receiving large files or streaming. But most of these rather niche & specific operations can always be off-loaded to targeted resources or 3rd party services to cope with the heavy lifting.
Goals for this Guide:
- Have nginx serving up static content on port 80 and 443
- Use Apache for all things PHP, including running PHP-FPM with Event MPM Module
We won’t bother adding TLS/SSL with Apache since Nginx will be handling it. Though, if we start adding multiple remote Apache backends, we will need to add TLS/SSL to those as well. Since Apache will be running on the same server instance as nginx in this scenario, we will assume all traffic to Apache (basically any requests for PHP) gets sent to port 8080.
We will assume Debian / Ubuntu-style Apache Web Server is being used for this guide. There are quite a few nuances between Debian/Ubuntu & CentOS/RHEL/Fedora Apache default install configurations (eg. “sites-available” symlinks), but if you are choosing those flavors of Linux, I hope you understand these nuances and adjust your configuration accordingly. Since Debian-based Linux is the most popular, I’ll stick with that paradigm throughout the rest of this guide. I’ll also assume you’re working off of a “fresh install” with no programs running that will conflict with ports 22, 80, 443, 3306 or 8080.
Install apache2 with:
sudo apt-get update ;
sudo apt-get install apache2 -y ;
Next, let’s change the default port that Apache2 listens on
sudo nano /etc/apache2/ports.conf ;Inside /etc/apache2/ports.conf
|
1 2 3 4 5 6 7 8 9 10 11 12 13 14 15 |
# If you just change the port or add more ports here, you will likely also # have to change the VirtualHost statement in # /etc/apache2/sites-enabled/000-default.conf #Listen 80 ### Comment this default ### Add the line below for initial debugging to confirm proper install (we will comment/remove this after) Listen *:8080 ### Add this line COMMENTED below since we will be using it after initial testing #Listen 127.0.0.1:8080 #NOTE: We aren't going to use TLS/SSL with the Apache instance, since both are internal # But, this is a security risk IF connecting nginx (our proxy) to # a remote Apache instance that is not running TLS/SSL on port 8080 ... |
Save the /etc/apache2/ports.conf file & close it.
Since the default Apache virtual host is also listening on port 80, let’s change that too in case in tries to cause us grief later on (sometimes it does).
sudo nano /etc/apache2/sites-enabled/000-default.confInside the “file” /etc/apache2/sites-enabled/000-default.conf
(It’s actually a symlink to /etc/apache2/sites-available/000-default.conf)
|
1 2 3 4 5 6 7 8 9 10 11 12 |
#<VirtualHost *:80> #comment this line out <VirtualHost *:8080> ### add this line, uncommented. ... # Don't make any more changes to this file # Just take notice of these lines down below ... #ServerName www.example.com ServerAdmin webmaster@localhost DocumentRoot /var/www/html ### The DocumentRoot sometimes varies between Linux Distros, ### Take note of its path. We'll be using this for a test in a little while. |
Save & exit the “file” /etc/apache2/sites-enabled/000-default.conf
By now, I’m sure the more seasoned & experiences Devs & Engineers are annoyed with my step-by-step for the n00bz. So this is where we would add in our own “custom” VirtualHost directive for Apache (aka vhost).
Since we’re already in the apache directories, let’s do that now:
Read this carefully:
sudo nano /etc/apache/sites-available/domain-name-goes-here.com.conf
Notice the difference between sites-enabled & sites-available. Very important for later.
Also, obviously be sure to substitute your domain name (or even an IP address could potentially work) where you see: domain-name-goes-here.com
You may have notice my super long path of:
/var/www/vhosts/user_accountname/domain-name-goes-here.com/actual-web-site-doc-root
You’ll need to change that to fit where ever your path is to your website DocumentRoot, below. I will suggest that if you plan on having more than one domain name hosted from your super nifty future bling bling tricked out nginx+Apache+Cloudflare site that we’re building now, that you at least separate your directory paths by one level instead of the 3 that I have shown as an example here. This will help keep your clients and their individual websites/apps separated and also give “one level up” for the actual website document root path to store certain content and provide some security. Sure, there’s a case against nesting too deeply due to “traversing” but CPUs are blistering fast nowadays. I wouldn’t worry about it. And that’s coming from an optimization enthusiast.
Having a flexible directory structure to keep all your own projects as well as your client projects organized will probably help you out later down the road. You can also always symlink your directory tree to where ever you like on your server setup, too.
Example file and directory structure in a crude & terrible, quick & dirty diagram that I’ll have to replace later:
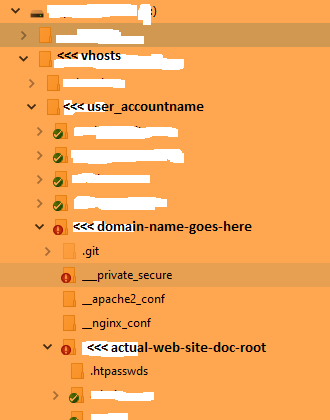
Anyway, edit your virtualhost .conf file to fit your directory layout.
|
1 2 3 4 5 6 7 8 9 10 11 12 13 14 15 16 17 18 19 20 21 22 23 |
# Apache Web Server Configuration for domain-name-goes-here.com:8080 <VirtualHost *:8080> DocumentRoot /var/www/vhosts/user_accountname/domain-name-goes-here.com/actual-web-site-doc-root ServerName domain-name-goes-here.com ServerAlias domain-name-goes-here.com www.domain-name-goes-here.com CustomLog /var/log/apache2/domain-name-goes-here.com.access.log combined ErrorLog /var/log/apache2/domain-name-goes-here.com.error.log <Directory "/var/www/vhosts/user_accountname/domain-name-goes-here.com/actual-web-site-doc-root"> Options -Indexes +FollowSymLinks +MultiViews AllowOverride All Order allow,deny allow from all Require all granted </Directory> # This `FilesMatch` block isn't necessary when only php-fpm is enabled (eg: `sudo a2dismod php7.4`) and mod-php is disabled (eg: `sudo a2dismod php7.4`) - but keeping here for safety & reference <FilesMatch \.php$> ProxyErrorOverride On SetHandler "proxy:unix:/var/run/php/php7.4-fpm.sock|fcgi://localhost" </FilesMatch> </VirtualHost> # Excellent write-up on optimizing your Apache configuration (update to PHP7.4+ to suit your upgrate needs) => https://www.digitalocean.com/community/tutorials/how-to-configure-apache-http-with-mpm-event-and-php-fpm-on-ubuntu-18-04 |
Save the file & exit.
If you already have web content in your directory, cool. I’m assuming you do at least have an index.php or index.html/js/etc in your document root if you’re G enough to be looking into how to do a reverse proxy config in the first place. 😉
Since we’re assuming a Debian-style default Apache setup (CentOS & RHEL don’t do this “sites-enabled” thing by default) we need to add a symlink to “enable it”. We can do that in two ways:
ln -s /etc/nginx/sites-available/domain-name-goes-here.com.conf /etc/nginx/sites-enabled/domain-name-goes-here.com.confor, use the apachectl tools with:
sudo a2ensite domain-name-goes-here.comThere’s more to come with Apache, but for now, I’ll stop for the night and add the PHP7.4 install with all its modules and conf stuff, then onto nginx and the testing of the reverse proxy setup.
I will go ahead and dump off the template for the nginx vhost.conf here to get that out of the way:
|
1 2 3 4 5 6 7 8 9 10 11 12 13 14 15 16 17 18 19 20 21 22 23 24 25 26 27 28 29 30 31 32 33 34 35 36 37 38 39 40 41 42 43 44 45 46 47 48 49 50 51 52 53 54 55 56 57 58 59 60 61 62 63 64 65 66 67 68 69 70 71 72 73 74 75 76 77 78 79 80 81 82 83 84 85 86 87 88 89 90 91 92 93 94 95 96 97 98 99 100 101 102 103 104 105 106 107 108 109 110 111 112 113 114 115 116 117 118 119 120 121 122 123 124 125 126 127 128 129 130 131 132 133 134 135 136 137 138 139 140 141 142 143 144 145 146 147 148 149 150 151 152 153 154 155 156 157 158 159 160 161 162 163 164 |
# domain-name-goes-here.com domain configuration - SSL(:443) with reverse proxy to Apache(:8080) in upstream template upstream upstream-domain-name-goes-here.com{ server domain-name-goes-here.com:8080; #See: http://nginx.org/en/docs/http/ngx_http_upstream_module.html#upstream # server unix:/var/www/vhosts/user_accountname/domain-name-goes-here.com/actual-web-site-doc-root; } # Redirect all traffic to port 80 (non-SSL) to port 443 (SSL) #redirect to www, always server { listen 80; server_name domain-name-goes-here.com; return 301 https://www.$host$request_uri; } #redirect to www, always, even on https://(:443) server { listen 443 ssl http2; listen [::]:443 ssl http2; server_name domain-name-goes-here.com ; ssl_certificate /var/www/vhosts/user_accountname/domain-name-goes-here.com/ssl/domain-name-goes-here.com-tld-cert-cloudflare-bundled-ecdsa-origin_ca_ecc_root.pem; ssl_certificate_key /var/www/vhosts/user_accountname/domain-name-goes-here.com/ssl/domain-name-goes-here.com-tld-key.pem; ssl_trusted_certificate /var/www/vhosts/user_accountname/domain-name-goes-here.com/ssl/cloudflare-bundled-ecdsa-origin_ca_ecc_root.pem; # (eg /etc/nginx/ssl/fullchain.pem; || /path/to/root_CA_cert_plus_intermediates;) resolver 127.0.0.1; # Find Cloudflare Resolver IP -> https://shadowcrypt.net/tools/cloudflare return 301 https://www.$host$request_uri; } #primary server directive server { listen 443 ssl http2; listen [::]:443 ssl http2; server_name www.domain-name-goes-here.com ; #Log files configs & locations access_log /var/log/nginx/domain-name-goes-here.com.access.log; error_log /var/log/nginx/domain-name-goes-here.com.error.log; #Site DocumentRoot, Index & settings root /var/www/vhosts/user_accountname/domain-name-goes-here.com/actual-web-site-doc-root; index index.php index.html index.htm; client_max_body_size 20M; ##### BEGIN error handling location /error-pages/ { internal; } # error_page 404 = /error-pages/404-page-not-found.php; # error_page 403 = /error-pages/403-forbidden.php; # error_page 500 502 503 504 = /error-pages/500-internal-server-error.php; # error_page 500 502 503 504 /50x.html; location = /50x.html { root /var/www/html; } ##### END error handling ##### W3 Total Cache - configuration file path #uncomment to enable # include /path/to/wordpress/installation/nginx.conf; ### allows for tools that use directories or config files (eg: Let's Encrypt) that use this directory (in a required & legitimate way) location ~ ^/\.well-known\._others { allow all; } ### protect xmlrpc.php from attacks location /xmlrpc.php { deny all; } location / { try_files $uri @apache; } location ~ ^/\.user\.ini { deny all; } location ~* \.(svg|svgz)$ { types {} default_type image/svg+xml; } location = /favicon.ico { log_not_found off; access_log off; } location = /robots.txt { allow all; log_not_found off; access_log off; } location @apache { proxy_set_header X-Real-IP $remote_addr; proxy_set_header X-Forwarded-For $remote_addr; proxy_set_header X-Forwarded-Proto $scheme; proxy_set_header Host $host; # proxy_pass http://upstream-$host$uri$is_args$args; # IMPORTANT: $is_args$args; Use HTTP for Apache(:8080) Reverse Proxy! ( https://wordpress.stackexchange.com/a/283101 ) proxy_pass http://upstream-domain-name-goes-here.com$uri$is_args$args; # IMPORTANT: $is_args$args; Use HTTP for Apache(:8080) Reverse Proxy! ( https://wordpress.stackexchange.com/a/283101 ) } location ~[^?]*/$ { proxy_set_header X-Real-IP $remote_addr; proxy_set_header X-Forwarded-For $remote_addr; proxy_set_header X-Forwarded-Proto $scheme; proxy_set_header Host $host; # proxy_pass http://upstream-$host$uri$is_args$args; # IMPORTANT: $is_args$args; Use HTTP for Apache(:8080) Reverse Proxy! ( https://wordpress.stackexchange.com/a/283101 ) proxy_pass http://upstream-domain-name-goes-here.com$uri$is_args$args; # IMPORTANT: $is_args$args; Use HTTP for Apache(:8080) Reverse Proxy! ( https://wordpress.stackexchange.com/a/283101 ) } location ~ \.php$ { proxy_set_header X-Real-IP $remote_addr; proxy_set_header X-Forwarded-For $remote_addr; proxy_set_header X-Forwarded-Proto $scheme; proxy_set_header Host $host; # proxy_pass http://upstream-$host$uri$is_args$args; # IMPORTANT: $is_args$args; Use HTTP for Apache(:8080) Reverse Proxy! ( https://wordpress.stackexchange.com/a/283101 ) proxy_pass http://upstream-domain-name-goes-here.com$uri$is_args$args; # IMPORTANT: $is_args$args; Use HTTP for Apache(:8080) Reverse Proxy! ( https://wordpress.stackexchange.com/a/283101 ) } location ~/\. { deny all; access_log off; log_not_found off; } ##### BEGIN SSL Configuration for domain-name-goes-here.com (See /etc/nginx/nginx.conf SSL block for Shared Config settings) ssl_certificate /var/www/vhosts/user_accountname/domain-name-goes-here.com/ssl/domain-name-goes-here.com-tld-cert-cloudflare-bundled-ecdsa-origin_ca_ecc_root.pem; # Cloudflare Universal SSL Cert ssl_certificate_key /var/www/vhosts/user_accountname/domain-name-goes-here.com/ssl/domain-name-goes-here.com-tld-key.pem; # Cloudflare Universal SSL Key ### SSL Sessions Settings ssl_session_timeout 1d; # IMPORTANT: using $host variable in 'ssl_session_cache' for the domain / subdomain that is in use (this is compatible with dynamic multi-domain & single domain configurations) ssl_session_cache shared:$host-session-cache-SSL:10m; # 10m = about 40000 sessions, shared(caching type):domain.name(cache name):XXsmhdMY(cache timer) # ssl_session_tickets off; ### DH params options ssl_dhparam /etc/ssl/dhparam.pem; # (`openssl dhparam -out /etc/ssl/dhparam.pem 4096`) ### SSL Protocols & Ciphers (TLSv1.3 most secure; SSLv3, TLSv1 and TLSv1.1 are depricated) # Most Secure with TLSv1.3 ONLY (lease backwards compatible) # Use with Cloudflare Proxy for better security ssl_protocols TLSv1.3; ssl_ecdh_curve X25519:P-256:P-384:P-224:P-521; #untested ssl_prefer_server_ciphers on; ### SSL Security Settings ### HSTS ("max-age=63072000" option is in seconds) # SEVERE Consequences for disabled SSL per domain before this cache expires! see here: https://support.cloudflare.com/hc/en-us/articles/204183088-Understanding-HSTS-HTTP-Strict-Transport-Security # add_header Strict-Transport-Security "max-age=31536000 includeSubDomains" always; # includeSubDomains "is in options" ### OCSP stapling ssl_stapling on; ssl_stapling_verify on; ssl_stapling_file /var/www/vhosts/user_accountname/domain-name-goes-here.com/ssl/domain-name-goes-here.com_cloudflare_ocsp.resp; # https://gist.github.com/fh/7444667 ssl_stapling_responder http://ocsp.cloudflare.com/origin_ecc_ca; # ssl_trusted_certificate /etc/nginx/ssl/cloudflare-bundled-ecdsa-origin_ca_ecc_root.pem; # (eg /etc/nginx/ssl/fullchain.pem; || /path/to/root_CA_cert_plus_intermediates;) ssl_trusted_certificate /var/www/vhosts/user_accountname/domain-name-goes-here.com/ssl/cloudflare-bundled-ecdsa-origin_ca_ecc_root.pem; # (eg /etc/nginx/ssl/fullchain.pem; || /path/to/root_CA_cert_plus_intermediates;) # resolver 104.27.147.179; # Find Cloudflare Resolver IP -> https://shadowcrypt.net/tools/cloudflare resolver 127.0.0.1; ##### END SSL Configuration for domain-name-goes-here.com } |